Kits by Carla Fort Denaud, FL
  • Our Unique Products
    • Shortcut Sheets
    • Talking Points
    • Newsletters
  • Events
    • Retreat
    • All Florida Shop Hop
    • Calendar >
      • Classes
      • Trunk Show
      • HST Virtual Class
  • Videos
    • Piece-by-Number
    • Talking Points
    • Shortcut Sheets
    • Carla's Tips
  • Store
  • Gallery
  • Contact Us...
    • Subscribe Newsletter
  • Blog
  • Our Newest Patterns

Talking Points in the Reclaimed West

11/17/2014

11 Comments

 
We are please to be part of the Timeless Treasures Blog Tour which runs all this week. Contest details and list of other participants can be found at the end of this blog entry. Timeless Treasures is celebrating the release of Judy & Judel Niemeyer's first-ever fabric line, The Reclaimed West. Checkout the whole collection and other examples of designs.
Picture

So here is the start of our design using 12 of the Reclaimed West Fabrics. 
A - JN-C2911-Rust, 1/3 yard
B - JN-C2915-Linen, 2/3 yard
C - JN-C2910-Brown, 5 yds, incl back & binding
D - JN-C2909-Ivory, 1 yard
E - JN-C2907-Yellow, 1 yard
F - JN-C2909-Ecru, 1-1/4 yards
G - JN-C2906-Sepia, 1-1/4 yards
H - JN-C2904-Khaki, 1 yard
I - JN-C2906-Charcoal, 1 yard
J - JN-C2904-Almond, 2/3 yard
L - JN-C2901-Red, 2-1/3 yds, incl border bkgd
L - JN-C2899-Beige, 1/3 yard

Picture
Star Burst Layout, 54 x 72
We have recently released the Talking Points Ruler Set which will be needed to create our project.

The Ruler kit includes both the basic and border rulers, cutting templates printed onto heavy-duty interfacing and an 8 page design guide.
Picture
Use the Talking Points ruler to create a simple 8 inch block (finished size). I chose to alternate the colors - light, then dark, light, then dark etc. There is a very subtle difference between some of the beige colors. This shows nicely when the blocks are assembled. 

Repeat this 48 times, rotating the layout to create the star burst effect.
Picture
In addition to the main blocks there are 28 border pieces (finished size 4 x 8 inches). To give the effect of the points bending back, the mirror of the border block is used for 24 pieces. The points on the border correspond to the fabric on the outside edge of the blocks. This will result in 4 different versions of the border.
The corner blocks are a simple 4" square of the background fabric.
Picture
The ruler is an 8" square plus 1/4" seam allowance on all sides. Lines zigzag at 2" increments creating odd shaped wedges. There are a total of 12 pieces labelled 1 through 12.
1 and 12 are the same size, 2 and 11 etc for a total of 6 different sized pieces (2 of each). Pieces 1 and 12 are triangles cut from 3" squares. The other pieces are cut using supplied templates.
The rulers have holes at each point. You will be marking your sewing line points through these holes as you place your assembly right side up under the ruler with each step.

The Ruler can be flipped to create a mirror version.
Picture
Tools you will need:
  • Side table for cutting and pressing
  • Cutting/pressing mat
  • Mini iron and rotary cutter
  • transparent ruler with 1/4" line
  • Marking pencils and pens
  • Pencil sharpener
  • Clips to hold pieces for each block set
Picture
Layout your fabric in order of A through L. Cut 48 triangles from 3" squares for pieces A and L.

Cut apart the template pieces on the printed solid lines and use each to cut 48 pieces of fabrics B through K. Remember the second and second to last are the same size, third and third to last are also the same. That is why there are only 5 cutting templates for the basic block. See the labels on each template. 
Picture
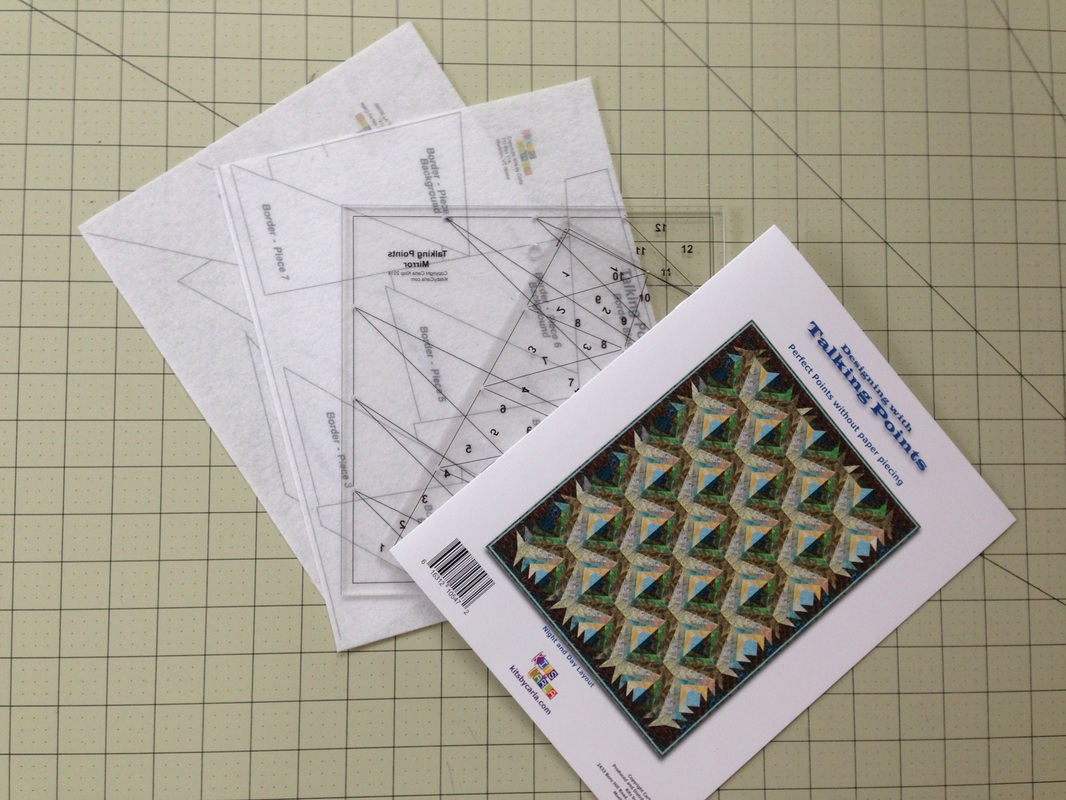
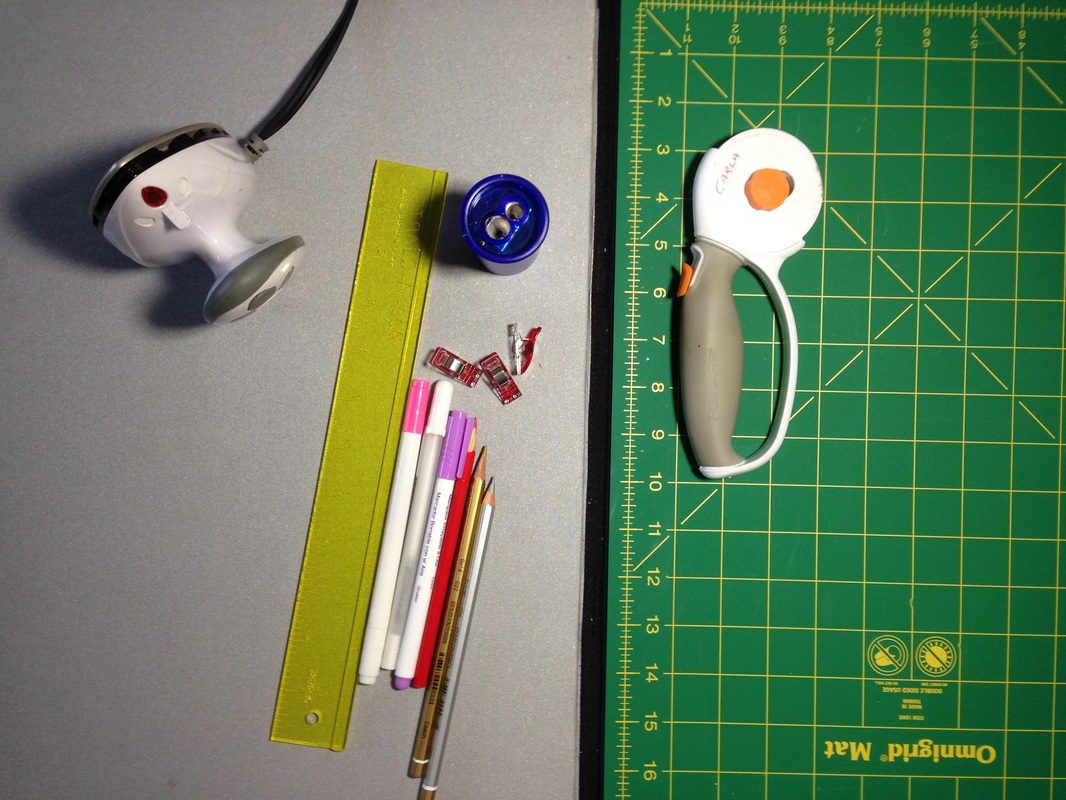
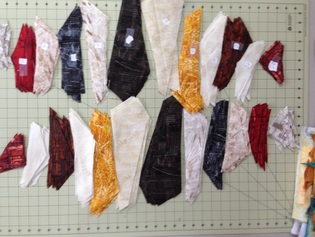
Stack your fabric and cut at least 8 layers at the same time. The template material won't slip - simply use a straight edge aligned slightly over the edge to avoid cutting into the template and slice with a rotary cutter.
OOPS!!
At this point I realized that the Reclaimed West Fabric is not a batik (of course I already knew this but hadn't thought of the impact on my design). Since I stacked the fabric folded when cutting, I had mirror versions of the pieces. This means I was unable to do 48 blocks the same, I needed to do half using the mirror and half regular. Not a problem, it just created a different layout as you can see here. This layout is called Cat's Eye.

I decided that I didn't want a dark color on the outside edge so I swapped the red Fabric A to the beige Fabric L for 6 of the regular blocks and 6 of the mirror blocks. 
Picture
Now I had two sets of colors, 24 of each piece for regular blocks and 24 of each for the mirror version.
Picture
I gathered one piece of each size, in order and clipped them together. Once all the pieces are assembled and clipped I was ready to make the first block. My planning (and thinking) is finished, this is production time.
Picture
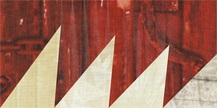
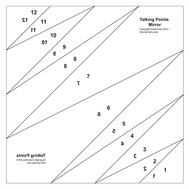
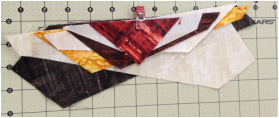
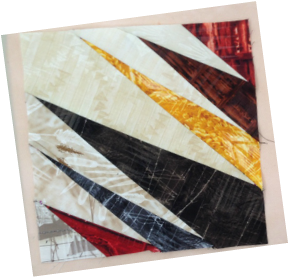
The slides that follow show all the steps in creating a finished block. For the first six pieces, place each new piece under the ruler to check for size and position. Mark points for the line you will be sewing through the holes and trim anything more than 1/4". This is because the first six pieces grow the block wider with each piece. If your edge is too narrow you might not have enough fabric at the seam allowance sides of the block.

After the half point has been reach, the pieces get progressively narrower - the issue of not enough fabric at the sides is no longer a problem.

Slides are better to review than a video - you can pause at any point, move forward or backward at your own speed and hopefully get a complete sense of how to use the Talking Points Ruler set.
So here is a finished block
Picture
Picture
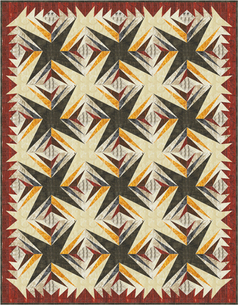
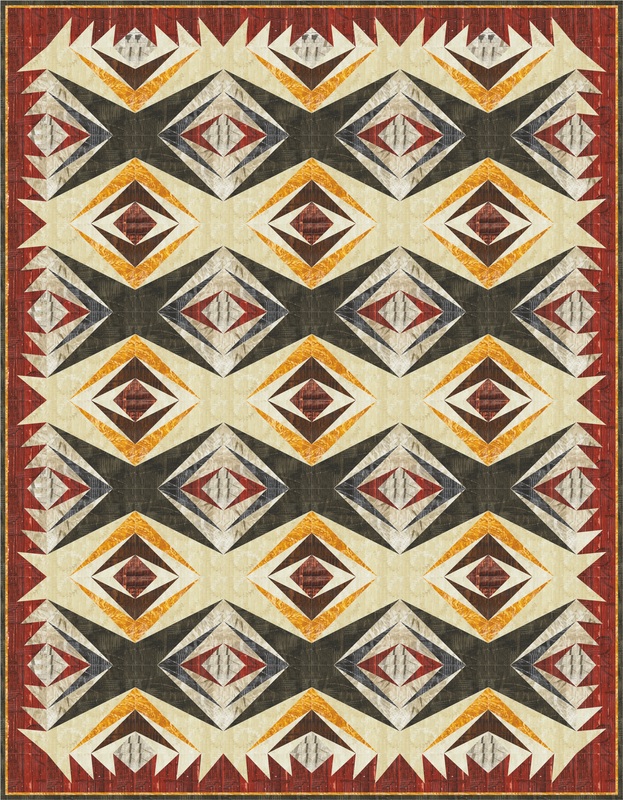
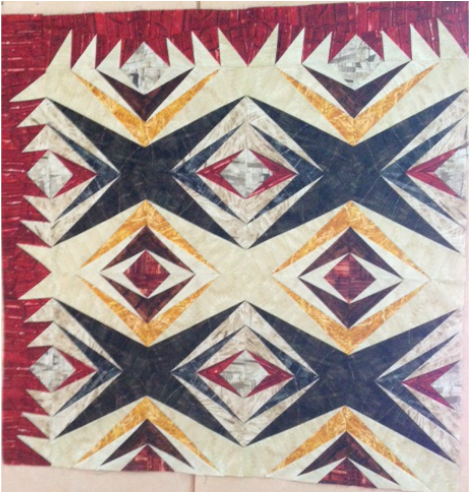
...and actual progress so far. The fabric was here when we returned from Houston Nov 5 but a retreat Nov 7 to 9 and a wedding out of town Nov 11 to 13 has prevented me from finishing the project. So far I love, love, love the fabric (did I say how much I love it?). Check back in a week or so to see the finished quilt.

Enter the Timeless Treasures contest at SewTimeless starting Nov 17 – it will be open for entries until Monday Nov 24 at noon. THREE WINNERS will be selected and each will receive: 
  • one fat eighth bundle of the entire Reclaimed West collection (24 pcs), 
  • one 52-pc charm pack of the Reclaimed West collection, 
  • one Braided Table Runner pattern by Quiltworx/Judy Niemeyer, 
  • one Geese in the West pattern by Cindi McCracken, 
  • one Reclaimed West bookmark & bag tag set from Quilt Dots, 
  • one spool of coordinating thread from the Reclaimed West designer thread set available from Aurifil. Photos of the prizes are available here.
List of other Blog Participants:

17-Nov  Queenie Quilts
17-Nov  Compass Point Quilts
18-Nov  HollyDee Quilts
18-Nov  Totes by Sandy
18-Nov  Just Stitchin with Deborah
19-Nov  Wish Upon A Quilt
19-Nov  Pine Needles Quilt & Sew
19-Nov  Stacey in Stitches
20-Nov  Moose on the Porch Quilts
20-Nov  Jennifer Eubank
20-Nov  Crafty Threads
20-Nov  Prairie Sky Quilts
21-Nov  Back Door Quilt Shoppe
21-Nov  Canton Village Quilt Works
21-Nov  Osie Lebowitz
11 Comments
Quilting Tangent
11/17/2014 08:26:44 am

Pretty Quilts.

Reply
Lauralee Hensley
11/19/2014 01:34:24 pm

Geometry lessons would come in handy making quite an involved quilt as this one is. Very intriguing to the eyes.

Reply
Carla
11/19/2014 11:57:47 pm

I always loved geometry. But the ruler takes care of all the calculations for you. When you make the same block over and over you get into a good rhythm. It is the selection of fabric and rotation of the block that produces all the interesting layouts.

Reply
Diane B
11/19/2014 01:59:41 pm

I'm so in awe and literally drooling! Reclaimed West prints are so stunning and remind me of Old Tucson.
The Blog Tour is on my list to follow each day and I can't wait for each artist/designers reveal. Thank you so much for your inspiration.

Reply
Sandi
11/20/2014 12:01:46 am

Your quilts are beautiful and so is the fabric!

Reply
dee
11/20/2014 01:07:20 am

I need this ruler - love this quilt - the fabrics are amazing

Reply
Colette link
11/20/2014 02:14:11 am

Very pretty quilt. Interesting ruler and how cool that it has a way to mark to match.

Reply
http://customresearchpapers.ws/blog/how-to-write-a-scientific-paper.html link
5/7/2018 08:17:54 am

This topic is very relevant for me so I would like to learn some more data and conduct an independent analysis.

Reply
conflict resolution essay sample link
5/16/2018 11:49:51 am

They who believe in this are completely right. I also think that it is very easy to create this things when following your step-y-steo instructions. Thanks.

Reply
Harold link
1/6/2021 10:51:08 am

Thanks ffor writing

Reply
Harold link
1/10/2021 01:28:32 pm

Thanks great blog

Reply


Leave a Reply.

    Carla

    Email a picture of your finished project and we will post to our gallery - carla@kitsbycarla.com

    Archives

    December 2017
    September 2017
    March 2016
    February 2016
    August 2015
    July 2015
    June 2015
    April 2015
    December 2014
    November 2014
    October 2014
    August 2014
    July 2014
    June 2014
    May 2014
    April 2012

    Categories

    All
    Placemats
    Snackmats
    Timeless Treasures
    Tonga Treats

    RSS Feed

If you are having problems with our store checkout, please call us 802-377-0361
              
  • Our Unique Products
    • Shortcut Sheets
    • Talking Points
    • Newsletters
  • Events
    • Retreat
    • All Florida Shop Hop
    • Calendar >
      • Classes
      • Trunk Show
      • HST Virtual Class
  • Videos
    • Piece-by-Number
    • Talking Points
    • Shortcut Sheets
    • Carla's Tips
  • Store
  • Gallery
  • Contact Us...
    • Subscribe Newsletter
  • Blog
  • Our Newest Patterns